
How to Remove Knotters from John Deere Model 14T / 214T Balers
The small square baler that started it all: John Deere 14T. Our customers say it makes the best bales of all the models since then. But there's been a bunch of improvements and modifications since the 14T, not the least of which is making it easier to remove the knotters for rebuilding or repair.
We get a lot of questions about this, so we've put together a step-by-step instruction guide. It's a good idea to take a picture of your knotters and shims so you have a baseline to work from when you're reinstalling the knotters.
We're keeping it simple, so here goes:

|
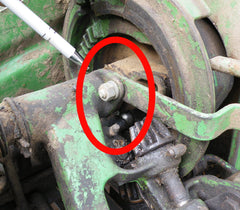
Remove needle lift arm pin |
 |
Loosen bolt and remove needle lift arm |
 |
Remove knotter frame bolts from each knotter |
 |
Remove cotter pin from shaft next to both knotters |
 |
Slide intermittent gear to the right to remove shaft key |
 |
Slide knotter and tucker shaft trip arm to the right to remove additional shaft key |
 |
Slide knotters and intermittent gears to the left |
 |
Remove bale sizer bracket |
 |
Slide intermittent gear and knotter to the left to remove shaft key |
 |
Remove set screw, slide to left to remove additional shaft key |
 |
Remove pin from the back |
 |
Remove 2 bolts from the back of the bevel gear shield |
 |
Remove last bolt from underneath front of the shield |
 |
Remove roller chain from knotter drive sprocket |
 |
The knotter shaft should slide to the left, carefully remove intermittent gears and knotters |
Leave a comment